READ THIS FIRST !!!
In this step, we will install and configure Mod Organizer 2, the best mod manager for any Bethesda game. You can alternatively use Vortex, but this guide does not provide details and information on how to use Vortex. If you use Vortex, you still need to read the Important Mod Installation Advice part of this section”.
Installing Mod Organizer 2
- Download the Mod Organizer 2 file from here
- Once the download has finished, run the installer
- When prompted to choose an install location, pick any location
- outside of any default Window folders (like
Program Files x86) and - outside of the game’s Root folder
- outside of any default Window folders (like
- Click Next until the installer finishes
Never use two mod managers for the same game at once. This will mess things up badly.
Configuring Mod Organizer 2
Initial Setup
- Run ModOrganizer.exe
- You will be prompted with a pop-up called Creating an instance, in which you should just select Next
- On the next page, select Create a portable instance
- On the next page, select Fallout 4
- On the next page, keep the Location file path default
If you have MO2 installed on an SSD or a HDD with little space, you can check the Show advanced options box and change the Downloads file path to a different drive with more space. This will not effect download/game performance, and the downloads can be deleted after the mods have been installed.
- On the last page, select Finish
- MO2 will launch and prompt you with a pop-up called Show tutorial?, in which you should select No
- From the pop-up called Register?, select Yes
- This pop-up will not show up if you have already registered a different instance of MO2
Configuring Settings
- Select the
 mo2 settings button at the top of MO2 to open the settings
 - In the Theme tab, you can select a different style from the drop-down menu at the top
- I use the vs15 Dark theme
- In the Nexus tab, select Connect to Nexus
- This option will not show up if you have already connected your Nexus account on a different MO2 instance

- MO2 will open your browser and prompt you to authorize the connection
- Once you authorize it, you can close out of your browser and of the MO2 settings
- Allow MO2 to restart if it asks
Creating Profiles
Mod Organizer 2’s Profiles feature allows for easy switching between different mod configurations. This is especially useful because you can easily switch between a FROST Profile and a non-FROST profile if you have the desire to play FROST and normal Fallout 4. In this step, we will create a profile for the guide while keeping a strictly-vanilla profile for testing/de-bugging. Profiles can be selected via the drop-down menu above the left pane.
- Select the
 mo2 profiles button at the top of MO2 to open the profiles menu
 - Select the Default profile, then select Copy
- Name the new profile FROST Select the FROST profile and make sure Use profile-specific Game INI Files is checked at the bottom
You may get a pop-up called INI file is read-only when attempting to make/select a new profile. If so then select Remember my choice from the drop-down at the bottom then click Clear the read-only flag
- Exit out of the profiles menu and select the FROST profile from the drop-down above the left panel

Enable Loose Files
This is a very important step!
- Make sure the FROST profile is active
- Click the
 at the top of MO2 and select INI Editor
 - Select the Fallout4Custom.ini tab
- Paste in the following to enable lose files:
[Archive] bInvalidateOlderFiles=1 sResourceDataDirsFinal= - Save your changes
These settings allow for files from mods to be loaded in-game. It is intentional that the bottom setting does not have anything after the =
If you did everything correctly, it should look similar to the picture. Keep in mind that your ini file might look different or even empty, that is normal. Just make sure that the settings you’ve added (the ones in the red box in the picture) are present.

INI Tweaks
In this step, we will configure the game’s INI files to increase performance/stability at minimal visual cost.
- Make sure the FROST profile is active
- Click the at the top of MO2 and select INI Editor
- Select the Fallout4Prefs.ini tab
- Use ctrl+f to find and change the following options
- Set fDirShadowDistance to 7000
- Set fShadowDistance to 7000
- Set uiOrthoShadowFilter to 2
- Set iMaxFocusShadowsDialogue to 3
- Set iMaxFocusShadows to 3
- Set fBlendSplitDirShadow to 96.0000
- Save your changes
- Close the .ini editor
These settings tweak shadows to drastically improve performance without much visual cost.
Note: You can also add bEnableWetnessMaterials=0 (or change it if it already exists) in your Fallout4Prefs.ini in MO2. This will deactivate the wetness effect from objects when it’s raining. This causes snow to not be “wet” anymore. Only do this if you really want it or are bothered that snow sometimes has a slight wetness/reflection effect when it’s raining.
Enabling steamloader (GOG users only)
- Note: Only do this if you are using the GOG version of Fallout 4! If you are using Steam, ignore this step!
- In MO2 you need to enable add a flag to F4SE so that MO2 can properly start Fallout 4
- Open the drop-down menu for the executables in MO2, and select Edit
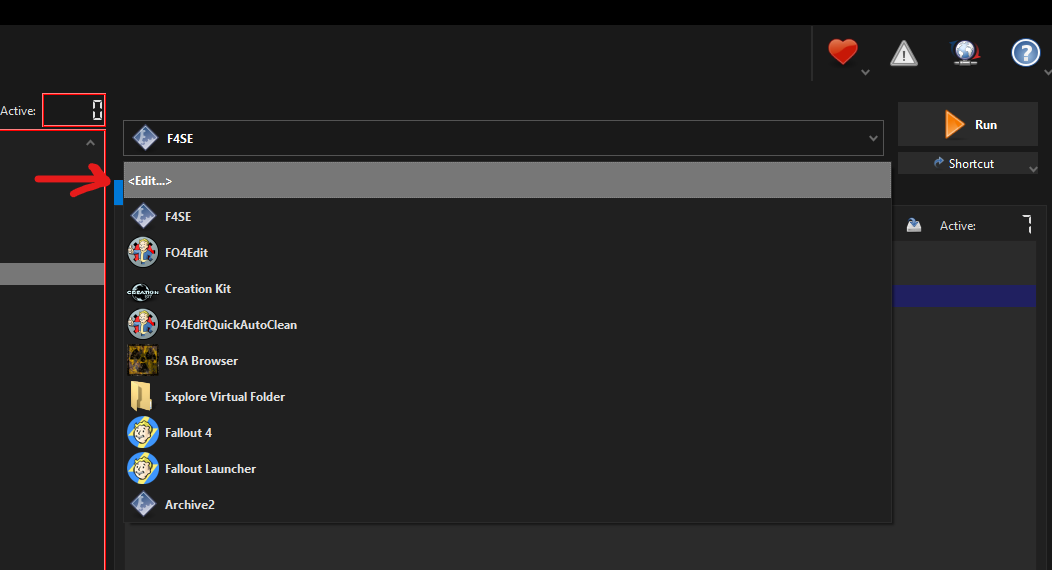
- Add
-forcesteamloaderin the Arguments section of the F4SE executable
How to MO2
If you need some information and help on how to use MO2, here are some helpful links.
- GamerPoets’ Videos: How to Use MO2
- A small video series to learn how to do things in MO2
- MO2 Sorting Crashcourse
- If this is your first time using MO2, read this article! It contains information that will help you understand the guide a bit better
Important Mod Installation Advice
If you are completely unfamiliar with Mod Organizer 2, I recommended watching GamerPoet’s video about mod installation in MO2. As it was made for Skyrim, it has some information that does not apply to Fallout 4, such as the Steam Workshop part which you can just ignore. However, the rest of the information about downloading/installing mods from Nexus still applies.
When the guide says to install a mod, it will be formatted as follows: Main File(s) - FROST (BA2 Version) 0.55. This is referring to the mod’s category on Nexus, the file name, and the file version. Sometimes I will leave the file version out, in that case just download the newest version.

Unless instructed otherwise, simply download the listed file using the Mod Manager Download button and install it through MO2.
When downloading multiple files from the same page, you will be prompted with a box in Mod Organizer 2 with the options Merge, Replace, and Rename. You should select the Rename option and rename the mod to its respective file name. This will make MO2 install them as separate files for easier management. If you are updating from an old version of a mod, you should select Replace. This will delete all the files from the old version of the mod and replace them,with the ones from the new version. This is the only time you should use the Replace option, otherwise always use Rename.
Sometimes, a mod will not have a Mod Manager Download, or will be hosted on a site other than Nexus. If that is the case, do the following:
- Click the Manual Download button (or whatever the download button is for the respective site)
- Once the download has finished, click the
 button at the top of MO2
 - From the new window, navigate to where the file was downloaded to and double-click it
- Finish the install normally